Setting up LXC with Intel GPU (Proxmox), keyboard, mouse and audio
The goal is to create a linux container with Proxmox that utilizes integrated Intel GPU. Additional requirements are mouse and keyboard must work also with audio.
There are some specificities in this guide. I use Xubuntu (Xfce) as the desktop environment it might be somewhat different from others, but I hope in overall it should be transferable.
Let’s start by assuming that we have created and installed our desktop environment on a new container already after which we can now begin.
Container with GPU
You should be well familiar with lxc.cgroup.devices.allow we need to declare it for all devices we want the container to have access to be it GPU, keyboard, mouse or audio.
For example, if you want to grant some access for container number 123, you go to /etc/pve/lxc/123.conf and adjust the configurations.
The overall limitation of using GPU inside the container boils down to this: we install the GPU driver on the host, allowing the container to access to the device, and reinstall the GPU driver on the container as well. This is because the container has no access to change the kernel modules, our driver module must already be loaded by the host.
In my case, the Intel GPU driver is already loaded in the Proxmox host under the name of i915 kernel module. You can see for yourself using lspci -v. Find the Intel GPU and see its loaded kernel module. Please note that i915 seems to be the module name for all GPUs.
Granting the container access
What then needs to be granted access to the container? My experience results in this:
/dev/dri/card0/dev/dri/renderD128/dev/fb0. This the frame buffer forcard0./dev/tty7. Actually, you can use any (that is not currently used). To my understanding this is like allowing the container to access our monitor, I guess.
To grant the container access, we need to have their major and minor numbers. Which could be obtained thus:
root@desktop:/dev# ls -l /dev/dri/card0
crw-rw---- 1 root video 226, 0 Mar 11 00:53 /dev/dri/card0
| Device | Major | Minor |
|---|---|---|
/dev/dri/card0 |
226 | 0 |
/dev/dri/renderD128 |
226 | 128 |
/dev/fb0 |
29 | 0 |
/dev/tty7 |
4 | 7 |
So we have the first change we need to make to the /etc/pve/lxc/<id>.conf should be:
lxc.cgroup.devices.allow: c 226:0 rwm
lxc.cgroup.devices.allow: c 226:128 rwm
lxc.cgroup.devices.allow: c 4:7 rwm
lxc.cgroup.devices.allow: c 29:0 rwm
lxc.mount.entry: /dev/dri/card0 dev/dri/card0 none bind,optional,create=file
lxc.mount.entry: /dev/dri/renderD128 dev/dri/renderD128 none bind,optional,create=file
lxc.mount.entry: /dev/tty7 dev/tty7 none bind,optional,create=file
lxc.mount.entry: /dev/fb0 dev/fb0 none bind,optional,create=file
Explanations
lxc.cgroup.devices.allow: c 226:0 rwm means allowing the container to rwm (read/write/mount) the device which has the major number of 226 and minor number of 0. You can use a wildcard here e.g. c 226:* rwm .
Granting the permission alone is not enough if the device is not present in the container’s /dev directory. The second part is just creating corresponding files in the container’s dev. If you want to create a whole directory (and everything within it) you could use create=dir option instead i.e. lxc.mount.entry: /dev/dri dev/dri none bind,optional,create=dir. This could be problematic if you have more than one GPU. Allowing the container to see a GPU meant not to be used by it is a bad idea because it leads to many problems down the line. For example, in my case, I also have an Nvidia card. The container’s Xorg tries to utilize both GPUs via Nvidia’s Optimus technology which might not be the thing you want.
Please note that dev/tty7 is the correct container’s path with leading / it won’t work.
The host’s TTY number could be any as said, but the container’s TTY needs to be tty7 unless configured otherwise. It seems that Xorg looks at this particular TTY, if it is not present you will see an error in container’s /var/log/Xorg.0.log. So it is possible to configure it this way: lxc.mount.entry: /dev/ttyN dev/tty7 where N is the number you like.
You can now stop and start your container:
pct stop <id>
pct start <id>
You should see the monitor displaying your desktop environment albeit keyboards and mouses might not work yet.
Many would suggest installing the Intel driver for accelerated video decoding on the container as well:
apt install i965-va-driver
Switching between TTY’s
You can use ctrl+alt+f<number> to switch to TTY<number>. This might not work 100% if the desktop manager on the current TTY ignore these keys.
Preventing the screen tearing
Using Intel GPU could see tearing artifacts while scrolling. The feeling is like playing games without vertical sync. If you don’t encounter this problem, feel free to skip.
File: /etc/X11/xorg.conf.d/20-intel.conf
Section "Device"
    Identifier "Intel Graphics"
    Driver "intel"
    Option "TearFree" "true"
EndSection
Thanks to https://wiki.archlinux.org/index.php/intel_graphics
Keyboard and mouse in LXC
Keyboard and mouse are /dev/input devices even though they are connected via USB ports. It is easy misled by /dev/usb but it has nothing to do with it. You don’t need to grant access to /dev/usb to make keyboard and mouse work.
We do the same thing as before using:
ls -l /dev/input
total 0
drwxr-xr-x 2 root root     180 Mar 10 17:05 by-id
drwxr-xr-x 2 root root     200 Mar 10 17:05 by-path
crw-rw---- 1 root input 13, 64 Mar 10 17:05 event0
crw-rw---- 1 root input 13, 65 Mar 10 17:05 event1
crw-rw---- 1 root input 13, 74 Mar 10 17:05 event10
crw-rw---- 1 root input 13, 75 Mar 10 17:05 event11
... a lot more ...
I personally grant and map them all to the container using, update the /etc/pve/lxc/<id>.conf:
lxc.cgroup.devices.allow = c 13:* rwm
lxc.mount.entry: /dev/input dev/input none bind,optional,create=dir
Next we need to tell the Xorg to use these input devices also telling which driver we want to use for each. I have found evdev driver to work well in my case both mouse and keyboard.
To install the driver in the container:
apt install xserver-xorg-input-evdev
To tell the Xorg which devices to load we need to know which /dev/input/eventN ‘s are related to our mouse and keyboard. This could be done using evtest. You can install the program on the host or on the container:
apt install evtest
Using it would result:
root@desktop:/dev# evtest
No device specified, trying to scan all of /dev/input/event*
Available devices:
/dev/input/event0:	Sleep Button
/dev/input/event1:	Power Button
/dev/input/event2:	Power Button
/dev/input/event3:	Logitech USB Receiver
/dev/input/event4:	Logitech USB Receiver
/dev/input/event5:	Microsoft Microsoft® Nano Transceiver v2.0
/dev/input/event6:	Microsoft Microsoft® Nano Transceiver v2.0
/dev/input/event7:	Microsoft Microsoft® Nano Transceiver v2.0
/dev/input/event8:	Video Bus
/dev/input/event9:	PC Speaker
/dev/input/event10:	HDA NVidia HDMI/DP,pcm=3
/dev/input/event11:	HDA NVidia HDMI/DP,pcm=7
/dev/input/event12:	HDA NVidia HDMI/DP,pcm=8
/dev/input/event13:	HDA NVidia HDMI/DP,pcm=9
/dev/input/event14:	HDA Intel PCH Front Mic
/dev/input/event15:	HDA Intel PCH Rear Mic
/dev/input/event16:	HDA Intel PCH Line
/dev/input/event17:	HDA Intel PCH Line Out
/dev/input/event18:	HDA Intel PCH Front Headphone
/dev/input/event19:	HDA Intel PCH HDMI/DP,pcm=3
/dev/input/event20:	HDA Intel PCH HDMI/DP,pcm=7
/dev/input/event21:	HDA Intel PCH HDMI/DP,pcm=8
/dev/input/event22:	HDA Intel PCH HDMI/DP,pcm=9
/dev/input/event23:	HDA Intel PCH HDMI/DP,pcm=10
Select the device event number [0-23]:
The mouse is Logitech in this case, and the keyboard is Microsoft. I could tell Xorg to load them all. However, if you are in doubt you can always test it by inputting the number and try typing or moving it to see if it triggers any event.
In container, edit the file /usr/share/X11/xorg.conf.d/10-lxc-input.conf:
Section "InputDevice"
    Identifier "event3"
    Option "Device" "/dev/input/event3"
    Option "AutoServerLayout" "true"
    Driver "evdev"
EndSection

Section "InputDevice"
    Identifier "event4"
    Option "Device" "/dev/input/event5"
    Option "AutoServerLayout" "true"
    Driver "evdev"
EndSection

... for any event you want ...
Restart the container again. Mouse and keyboard should now work.
Audio in LXC
Most of the configurations in this guide need some understanding of the linux hardware and software stack which I am lacking. But none is worse in the case of audio. This is convoluted. I just managed to make it work, but don’t expect my explanation to be correct.
I think a good starting point if you are interested in keywords in linux audio stack is: https://www.cnblogs.com/little-ant/p/4016180.html. This is not the original post, but it is a working link.
Disclaimer: I have seen many approaches to audio in container. In this guide, it will be just one of them.
Make audio work on the host
To be foolproof, I think it is a good start if we can make sound from the host first, and then we will make it work from the container. We will need many tools in alsa-utils so we first install it on the host.
apt install alsa-utils
Now, we are going to list the audio devices:
root@desktop:/dev# aplay -L
null
    Discard all samples (playback) or generate zero samples (capture)
default:CARD=PCH
    HDA Intel PCH, ALC887-VD Analog
    Default Audio Device
sysdefault:CARD=PCH
    HDA Intel PCH, ALC887-VD Analog
    Default Audio Device
front:CARD=PCH,DEV=0
    HDA Intel PCH, ALC887-VD Analog
    Front speakers
surround21:CARD=PCH,DEV=0
    HDA Intel PCH, ALC887-VD Analog
    2.1 Surround output to Front and Subwoofer speakers
surround40:CARD=PCH,DEV=0
    HDA Intel PCH, ALC887-VD Analog
    4.0 Surround output to Front and Rear speakers
surround41:CARD=PCH,DEV=0
    HDA Intel PCH, ALC887-VD Analog
    4.1 Surround output to Front, Rear and Subwoofer speakers
surround50:CARD=PCH,DEV=0
    HDA Intel PCH, ALC887-VD Analog
    5.0 Surround output to Front, Center and Rear speakers
surround51:CARD=PCH,DEV=0
    HDA Intel PCH, ALC887-VD Analog
    5.1 Surround output to Front, Center, Rear and Subwoofer speakers
surround71:CARD=PCH,DEV=0
    HDA Intel PCH, ALC887-VD Analog
    7.1 Surround output to Front, Center, Side, Rear and Woofer speakers
hdmi:CARD=PCH,DEV=0
    HDA Intel PCH, HDMI 0
    HDMI Audio Output
... many more ...
It is unclear to know which is responsible for the output we are listening to. In my settings, I’m connecting a monitor via an HDMI cable, so I’m looking for HDMI in particular.
To know which one, we need test each output by producing some noise. This could be done using speaker-test:
You might need to test all of them, but the command is something like:
speaker-test -D <name> -c 2
# for example
speaker-test -D hdmi:CARD=PCH,DEV=0 -c 2
One of them would produce noise, and you now know which one it is, and also know that the audio works.
Make audio work on the container
At the container’s side, we are looking for /dev/snd which has the major number of 116. We would map them all to the container.
root@desktop:/dev# ls -l /dev/snd
total 0
drwxr-xr-x 2 root root       80 Mar 10 17:05 by-path
crw-rw---- 1 root audio 116,  8 Mar 10 17:05 controlC0
crw-rw---- 1 root audio 116,  2 Mar 10 17:05 controlC1
crw-rw---- 1 root audio 116, 17 Mar 10 17:05 hwC0D0
crw-rw---- 1 root audio 116, 18 Mar 10 17:05 hwC0D2
crw-rw---- 1 root audio 116,  7 Mar 10 17:05 hwC1D0
crw-rw---- 1 root audio 116, 10 Mar 10 17:05 pcmC0D0c
crw-rw---- 1 root audio 116,  9 Mar 10 17:05 pcmC0D0p
crw-rw---- 1 root audio 116, 16 Mar 10 17:05 pcmC0D10p
... many more ...
Please note that if the audio producer in the container is not root, let’s say joe, you need to add joe to audio group using, at the container:
sudo usermod -aG audio joe
At the host, we need to update the container configuration again:
lxc.cgroup.devices.allow = c 116:* rwm
lxc.mount.entry: /dev/snd dev/snd none bind,optional,create=dir
After restarting the container, test if the audio devices are available:
aplay -L
You should see the very same output as the root’s one.
Finally, we tell the Pulse audio in the container to manually look for alsa-sink on a specific device we have tested. Modify the file /etc/pulse/default.pa by looking for load-module module-also-sink. You might see it commented, uncomment it, and update it so:
load-module module-alsa-sink device=<name>
# for example
load-module module-alsa-sink device=hdmi:CARD=PCH,DEV=0
After that you might need to reload the pulse audio, in the container:
pulseaudio -k
Or restart the container should yield the same result. Your audio should now work. You can go to PulseAudio app and see if it the audio device is recognized.
However, it is possible that the device is muted (by some external means). To guarantee it is not, we run, in the container:
alsamixer
You should see the following screen:
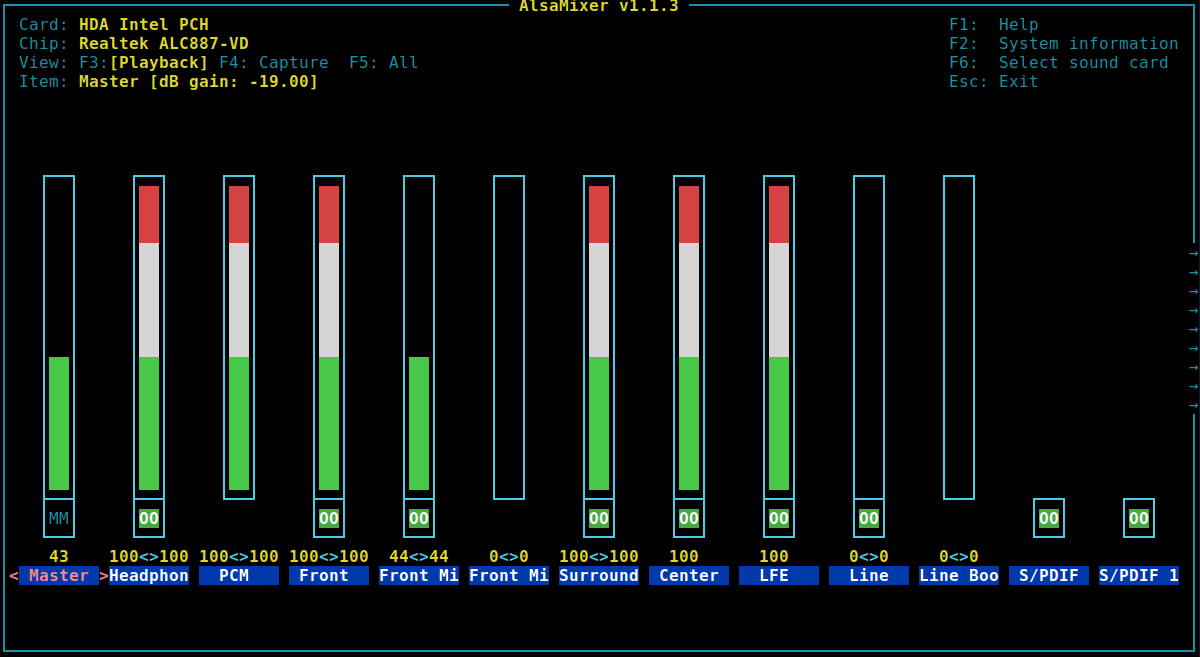
If you see any of them to be MM which is muted. You need to make it not by selecting it and press M. You’ll see the following screen:
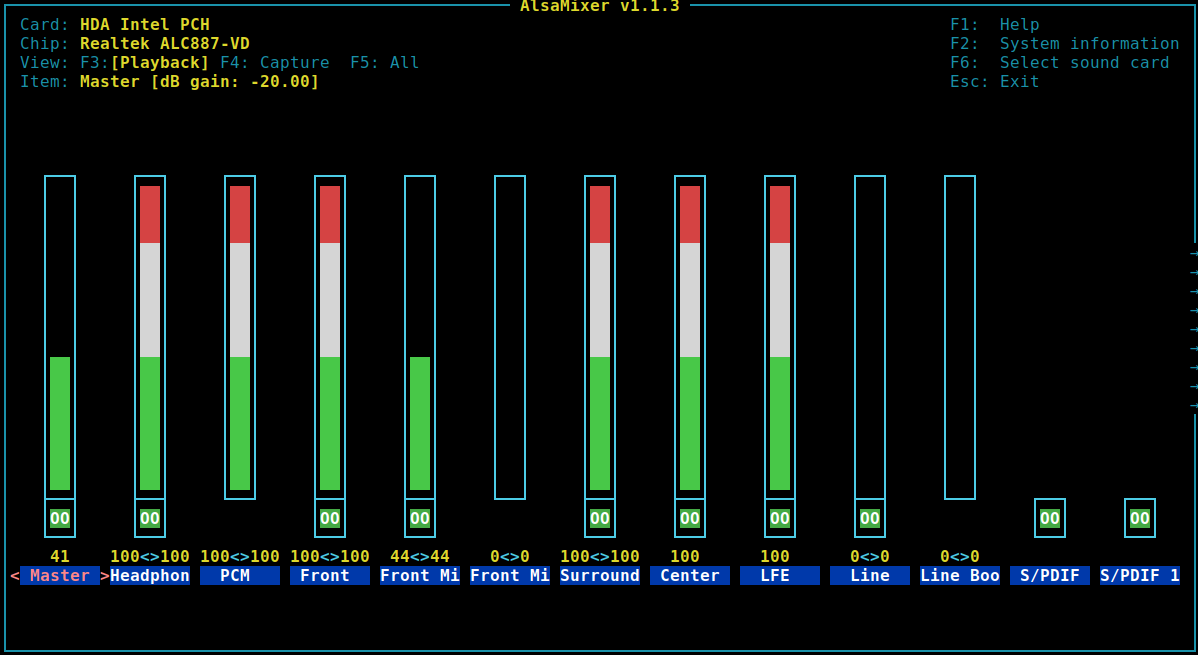
Nothing is muted now.